Visio: Increase the Number of Times You Can Undo Actions

By default, you can use the 'Undo' button up to 20 times in a row in Microsoft Visio. After that, you're out of luck. If you're like me though, and enjoy being able to time travel a bit more, you're going to want to change that setting to the highest number possible.

To change the setting, go to the 'File' tab, and then click 'Options'. In the 'Visio Options' window that will appear, choose 'Advanced' from the menu on the left. Now, in the first section, 'Editing Options', the 11th option from the top is 'Maximum number of undos'. Go ahead and change the number in the listbox to any number that is equal to or less than 99.

You could also reduce the number of times that you can undo actions, but why would you want to do that? The only real advantage is that it reduces the amount of extra data sitting in memory... but that shouldn't be too much of an issue unless you're using an ancient computer.

In any case, it's up to you - and you're free to change it any time you feel like it. Happy drawing!

Read More

OneNote for Android

It’s been a few months now since Microsoft released their official OneNote app for Android, and I’ve finally taken the time to install it on my Samsung Galaxy S II. Why did it take me so long? Well, you can probably see from the lack of frequent posting lately that I’ve been a bit busy.

In any case, the app is fantastic. If you’ve read my previous post about how much I love OneNote, then you might not be surprised to find out how excited I am about the mobile version. Between university, my full-time job, and a handful of side projects, I keep pretty busy and I’m often on the go. Being able to access my notes from any device I happen to have on hand makes keeping up with my studies very easy to manage.
Setting it up was a breeze, as my phone immediately knew to connect to my SkyDrive account and to give me access to my notebooks that are stored there. I was happy to see a setting that forced synchronization to only happen when connected through Wi-Fi.

Given the freeform nature of notes, I was really curious to see how the app would display them on my phone. I have a lot of images and handwritten items scattered throughout, and I play around with different widths for my text boxes. Unfortunately, the handwritten items aren’t visible, but the app does a really clean job of displaying the text and images on the screen in a way that doesn’t have me zooming and panning like crazy.

It’s certainly not as rich in features as the client version or the Web app, but I give it top marks for having a simple interface and for bringing my notebooks to my phone.

If you’re late to the party like me and haven’t yet given it a shot, go check it out on Google Play. The first 500 notes are free, which will give you the chance to play around with it and decide whether or not you want to fork over some money for unlimited use.

Read More

Excel: Hide the Contents of a Cell

Trying to hide the contents of a cell by simply changing the fill colour of the cell and then matching the font colour so that it blends in perfectly is sometimes an acceptable solution, but you can run into problems when you start highlighting cells or applying conditional formatting. Something like adding in row striping can cause any cell values that you've tried to hide to suddenly be revealed.

Yes, there's a more elegant way to hide the contents of cells. You can do it without messing around with the font and fill colours, and you can do it without hiding entire rows or columns.

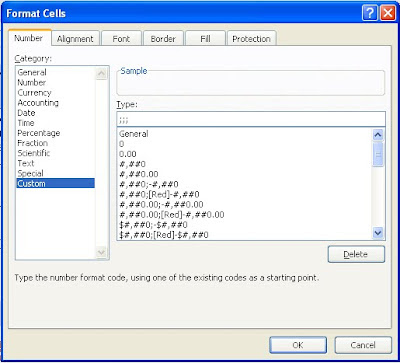
First, select the cell or range of cells that you would like to hide. Right-click and choose 'Format Cells...'. Now, make sure you're in the 'Number' tab of the 'Format Cells' window that pops up. From the list on the left hand side, choose the very last option, 'Custom'. Now, to the right hand side of the window, type in three semicolons in the 'Type' text box. It should look like this:


Click the 'OK' button when you're done, and you'll see all of the values of the cells that you selected will have disappeared.

How does it work?

Custom number formats allow you to choose how you’d like the contents of a cell to be displayed. There are four different sections to a number format: positive numbers, negative numbers, zero values, and finally text values. When you specify a custom number format, you separate these different sections with a semi-colon. I’m not going to go into detail about how to set different number formats in today’s post, but the reason why the values are hidden when you enter ‘;;;’ as a number format is because you’ve told Excel to show nothing for positive numbers, nothing for negative numbers, nothing for zero values, and nothing for text values. The result is a cell that looks completely empty despite containing a value.
Read More

Excel: Convert Temperatures Between Celsius, Fahrenheit, and Kelvin

It’s not difficult to enter a formula into Microsoft Excel to convert between Celsius, Fahrenheit, and Kelvin, but why not use a built-in function to do the work for you? Meet CONVERT, a handy function that lets you convert between different units of measurement. It’s not limited to temperatures, but those are the only units I’m going to discuss in this post.

The CONVERT function needs three pieces of information from you: the value that you would like to convert, the unit of measurement you are converting from, and the unit of measurement you are converting to.

If the temperature is in cell A1 and is measured in Celsius, then use this formula to convert it to Fahrenheit:

=CONVERT(A1,"C","F")

If the temperature is measured in Fahrenheit, then use this formula to convert it to Celsius:

=CONVERT(A1,"F","C")

Use the same function but replace the “F” (Fahrenheit) or “C” (Celsius) with a “K” if you are looking to convert to Kelvin. For example, this formula will convert a temperature from Fahrenheit to Kelvin:

=CONVERT(A1,"F","K")

Make sense? Feel free to post a comment if you’re having trouble.
Read More

Excel: Leap Year Formula

Trying to figure out if a date occurs during a leap year in Microsoft Excel? It's February 29th, and I have decided to post a formula that will help you to quickly determine this for any given date.

If cell A1 contains the year alone (e.g. '2012'), then the following formula will return 'TRUE' if it is a leap year (and 'FALSE' if it isn't):

=IF(OR(MOD(A1,400)=0,AND(MOD(A1,4)=0,MOD(A1,100)<>0)),TRUE,FALSE)

If cell A1 contains an entire date (e.g. '2/29/2012'), then you will want to adjust your formula to use only the year portion of the date:

=IF(OR(MOD(YEAR(A1),400)=0,AND(MOD(YEAR(A1),4)=0,MOD(YEAR(A1),100)<>0)),TRUE,FALSE)
Read More

Word: Slow Scrolling Fix for Image-Heavy Documents

This week I had an e-mail from someone who was frustrated with how it had become so slow to scroll through one of his Microsoft Word documents. I immediately asked if there were a lot of images in it, and he replied to say that it was absolutely full of high-resolution pictures.

If you've ever worked with an image-heavy document, you might have experienced this problem with slow scrolling. The good news is that you can speed it up again if you're willing to temporarily make all of those images invisible.

Go to the 'File' tab, and then choose 'Options'. From the options on the left-hand side of the window that pops up, choose 'Advanced'. Now scroll down to the 'Show document content' section, and place a checkmark next to 'Show picture placeholders'. When you're done, press the 'OK' button.

By choosing this option, you're letting Word show empty boxes instead of loading every single image. You should find that scrolling is no longer quite as painful.

Unfortunately, there is one catch: this will only work for images that have the wrapping set to 'In Line with Text'. If the wrapping is any other kind, setting the placeholder option will not have any effect.
Read More

Outlook: Synchronize with Google Calendar

Do you use Google Calendar and Microsoft Outlook? If you're using Outlook 2003/2007/2010 and Windows XP (32-bit, not 64-bit)/Vista/7, there's a tool called Google Calendar Sync that you can use to keep your calendars synchronized.

First, follow this link and download the application:

When you're setting it up, you'll have the ability to choose how you would like it to synchronize. Your three options are:
  • 2-way - Any events in Outlook will show up in Google Calendar, and vice versa.
  • 1-way: Google Calendar to Microsoft Outlook calendar - Events in Google Calendar will be synchronized with your Microsoft Outlook calendar.
  • 1-way: Google Calendar to Microsoft Outlook calendar - Events in your Microsoft Outlook calendar will be synchronized with Google Calendar.
I like this tool because it helps me keep everything up-to-date between my personal calendar and my work calendar. The different options for synchronizing mean that I can keep my own personal calendar up-to-date without bringing all of my personal events onto my work calendar.
Read More

Outlook: Get Rid of Items Stuck in Outbox

Ever had something stuck in the Outbox folder of Microsoft Outlook and gotten this lovely message when you try to get rid of it?:

"Can't open this item. Outlook has already begun transmitting this message."

It's an annoyance, for sure. Sometimes this can happen if you, like I did today, misjudged the size of your attachments and your server is suddenly struggling to send a massive e-mail. The irritating thing is that Outlook doesn't seem to have a mechanism in place to tell it, "Wait! I don't want to send that e-mail anymore!".

Here's how to delete the e-mail from your Outbox, or at least have the ability to open it and to get rid of the gigantic attachment(s). Go to the 'Send/Receive' tab on the ribbon, and click on the 'Work Offline' button. You're temporarily preventing Outlook from trying to send the e-mail, which should allow you to go to your Outbox and then open, edit, or delete the offending message as you please. When you're ready to go again, just go back to the 'Send/Receive' tab, and click the 'Work Offline' button once more to go back online.

Phew!
Read More