Excel: Join Together Strings Using Concatenate

Concatenate! It's a bizarre-looking word if you've never seen it before, but the application's actually pretty simple AND very useful.

So here's a scenario for you: You have a spreadsheet listing contact information for hundreds of people. Last names are in column A, first names are in column B. But you need the full name now, for some reason. Here's where concatenate comes in!

Concatenate lets you basically take different pieces of text (called "strings") and put them together. Yes, you can do this with numbers as well, just know that the end result will be formatted as text (there's a way to make it a number, but that'll be a topic for another post). In this case, you're wanting to take the first name, put a space in between, and then have the last name show at the end. Here's the formula to use:

=CONCATENATE(item1,item2,item3,item4,etc.)

Just write "=CONCATENATE", then put in brackets each item you'd like to join together, separated by commas. You can put in cell references, formulas, or even other pieces of text. If you want specific text to show up, make sure you put it in quotes.

So for my example, assuming there's a last name in cell A2 (DuBois), and a first name in cell B2 (Stacy), I'd enter this formula into cell C2:

=CONCATENATE(B2," ",A2)

That's saying: take whatever is in cell B2, then put in a space, then put in whatever's in cell A2. So for this example, my formula would return:

Stacy DuBois

And of course, you're free to fill this formula down through your datasheet and watch as all of the names (or whatever it is you're doing) are automatically generated.

Some people like to use this to generate usernames. You can use the LEFT function to pull the first letter of the first names, and use concatenate to join it with the last name.

The possibilites are endless!
Read More

Thank You

This message is coming later than I'd intended, as I've been rather busy lately!

I'm pleased to say that I placed 9th for Canada at WorldSkills Calgary 2009, and my high score earned me a Medallion of Excellence. What an amazing experience it was! Thanks so much to everyone who has helped me along the way, particularly the fantastic people at Skills/Compétences Canada, Susan Gwin, and Paul Drye from 1-on-1, who helped me prepare for competition.


The opportunities I've had along the way have been incredible. Over the past year, I've received letters and e-mails of support from numerous organizations, software and equipment from sponsors, speaking engagements at various events, and a bit of media attention (which has been pretty neat!).

Last, but certainly not least, I'd like to thank my friends and family who put up with my stressed out self for the past year - I couldn't have done this without their constant support.


Congratulations to Team Canada for bringing back 8 medals and 12 medallions of excellence! To anyone out there who's considering a career in a skilled trade or technology - go for it! It's amazing how far a pile of hard work will get you.

-Stacy
Read More

Word: Non-Breaking Hyphens and Spaces

Ever type something like a phone number in Word with hyphens, and get irritated when the phone number gets broken up on two separate lines like this?:

You can contact me any time you like! My phone number is 555-555-
5555.


Sometimes you'd prefer the number to stay together in one piece, like this:

You can contact me any time you like! My phone number is
555-555-5555.


In instances like this, most users would just press the Enter key before the phone number to make sure it's on its own line. But that's kind of sloppy, because you might add text later that makes it unnecessary for it to be the start of a line. It would be best to use what's called a "non-breaking hyphen". It's a way of putting in a hyphen and telling Word to make the ends "sticky" (so to speak) and keep everything next to it together.

How? Instead of just pressing the '-' key like you normally would, hold down 'Control', 'Shift', and '-'. This will insert a non-breaking hyphen.

You can also make a "non-breaking space" using the same technique. Just hold down 'Ctrl', 'Shift', then press the space bar. This is pretty useful for things like legal documents where an entire name needs to stay together on one line. You can put a non-breaking space in between the parts of the name to make sure they'll stay together.
Read More

Gone for now, back in a couple of weeks!


I'm very, very busy getting ready to represent Canada next week at WorldSkills Calgary 2009. Unfortunately I won't be posting any new tips and tricks until everything's over - but you can expect much more interesting/advanced content later! I haven't been sharing my best tricks yet, since I don't want to give the other competitors any great ideas.

Check out the official WorldSkills Calgary 2009 web site, and cheer on Team Canada as we take on the world next week! I'll be there to show my skills in the IT/Software Applications category.

Ciao for now!

Stacy
Read More

Excel: Currency Format Shortcut

Last week, someone asked me if there's a keyboard shortcut to change a cell's number format to currency - and I'm pleased to say that yes, there is! And it's pretty easy to remember too:

Ctrl + Shift + $

This will change the number format of whatever cell(s) you have selected to currency format (with the default dollar sign and two decimal places).
Read More

Word: Where did my ruler go?

This is a really common question I get from new Word 2007 users. I'll answer it in today's entry: where did my ruler go?

Don't worry! It's still there, you just need to make it visible. Go to the 'View' tab on your ruler, and check off the 'Ruler' box (it's in the 'Show/Hide' group on the left-hand side of the ribbon).
Read More

How to Save as PDF

Want to save something in Office 2007 as a PDF?

Click here to go to the Microsoft site and download their PDF add-in (the grey 'Download' button).

Once installed, you'll have the option to save as a PDF in the 'Save As' menu option.

This add-in works with the following programs:

Access 2007
Excel 2007
InfoPath 2007
OneNote 2007
Office PowerPoint 2007
Office Publisher 2007
Office Visio 2007
Office Word 2007
Read More

Excel: Add a Background Picture

Ever wanted to use an image as a background in your spreadsheet?

Just click on the 'Page Layout' tab of the ribbon, then click the 'Background' button (it's in the 'Page Setup' group). Look through your folders until you find the image you'd like to use, then click 'Insert'.
Read More

PowerPoint: Shortcut to Insert New Slide

Adding a new slide to your PowerPoint presentation is as easy as hitting:

Ctrl + M

If you're wanting to use your mouse and you're not in the 'Home' tab of the ribbon, you can right-click on the left-hand side of your screen where your slides are all listed and click 'New Slide' from there.
Read More

Excel: Prevent Auto Open Macro from Running

Have an Excel workbook you'd like to open, but don't want an auto open macro to execute? Press your Shift key as you open the file, and keep it pressed until it's completely open. This will prevent the auto open macro from running.
Read More

Inserting a Comment in Excel (and shortcuts too!)

This week's question: "How do I insert a comment into my Excel spreadsheet?"

As with most of Microsoft Office, you have a few different options. If you click on the 'Review' tab on your ribbon, you can click 'New Comment' (fifth button from the left).

Another way to add a comment is to right-click the cell you'd like the comment in, and choose 'Insert Comment' from the menu that pops up.

Lastly, I'll share with you the keyboard shortcut. Hit Shift + F2, and you'll find a new comment waiting for you in whichever cell you currently have selected.
Read More

Excel: Insert a Picture


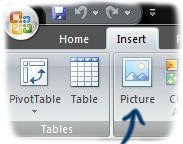
Want to include a picture on your spreadsheet? It's quick and easy. Go to the 'Insert' tab, and you'll see the third button from the left is 'Picture'. If you click it, you can browse through the folders on your computer until you find the picture you'd like to include. Click 'Insert', and you'll find the image sitting in whichever worksheet you're currently working on. You can resize it and move it around just like any other object until it's positioned as you'd like.

Alternatively, you can copy and paste pictures from other sources - like the Internet, or another file.
Read More

Word: Convert Fields to Regular Text

This handy shortcut will basically stop a field from being a field. It's sort of like changing a formula into a straight value in Excel. Select the field in Word and press:

Ctrl + Shift + F9

So, if you have a field in Word that performs a calculation, or maybe it's a picture brought in through mail merge, you can select it and use this shortcut to take away the field entirely and just leave you the text (or image). You'll no longer be able to "update" it, as it won't be a field anymore.
Read More

Turn Off Gridlines in Excel

Those gridlines you see in Excel can be turned off, if you'd like. You can still go ahead and put borders around cells, but to turn off the display of the entire grid, go to the 'View' tab on the ribbon, and look in the second group - Show/Hide. Uncheck 'Gridlines', and poof! They'll disappear from view. Should you decide you'd like to see them again later, just go back to this same spot and check the box again.

Read More

Word: Select All Shortcut

If you'd like to select your entire document in Word, there's always the keyboard shortcut control A:

Ctrl + A

Something a lot of users don't know, though - if you're more of a mouse user, you can actually just move your mouse over to the left margin on whichever page you're on. You'll see your pointer turn into an arrow pointing a bit to the right. Click three times, and you'll have selected your entire document.
Read More

Word: Remove Hyperlinks and Stop Automatic Hyperlinks

Ever typed a web or e-mail address and been annoyed that it's been turned into a blue, underlined hyperlink when you'd rather it just look like regular text?

My good news for you is that it's quick and easy to undo: just right-click the hyperlink, and click 'Remove Hyperlink'.

If it's not a one-off thing, and you find yourself constantly removing the hyperlinks, you may want to turn that feature off entirely. Click the Microsoft Office button, and choose 'Word Options'. On the lefthand side of the box that comes up, click 'Proofing'. At the top, click the 'AutoCorrect Options...' button. Click the 'AutoFormat As You Type' tab, and uncheck 'Internet and network paths with hyperlinks'. Click 'OK' to get out of both open windows, and now you'll notice your hyperlinks don't automatically get formatted as you type.
Read More

Word: Quick Way to Edit Headers and Footers

Rather than using the ribbon, there's actually an easy way to get into your headers and footers in Word using your mouse. Just right-click anywhere at the very top or bottom of your document, and you'll see you can click 'Edit Header' or 'Edit Footer'. You need to be in the 'Print Layout' view for this to work (that's the default view). It's not that much shorter than using the ribbon, but a lot of people find it easier to get into their headers and footers using this method.
Read More

Add Line Numbers to Access Reports

Someone e-mailed me this week asking me about adding line numbers into a report in Access. Not only is it possible, but it doesn't take very long to set up. Here's how to number each item on your report sequentially:

1. In Design View, add a Text Box control to the 'Detail' section (where you'd like the numbers to show up). You'll probably want to delete the label associated with it.

2. Right-click the control, select 'Properties' (you can skip this step if your property sheet is already open). On the Properties sheet that appears, click the 'Data' tab.

3. In 'Control Source', enter an equals sign and the number one: =1

4. In 'Running Sum', choose 'Over Group' or 'Over All'. Choosing 'Over Group' means that it will start over at 1 when a new group starts. 'Over All' will keep numbering up over the entire report, regardless of grouping.

That's it!
Read More

Word: Print Without Highlighter Marks

Sometimes you're working on a document and you've highlighted all sorts of things in it, but you'd like to print it without all the highlighter marks. You don't have to go through and unhighlight everything, you can actually temporarily turn them off. Here's how:

Click the Microsoft Office button, and choose 'Word Options'. On the lefthand side of the box that comes up, click 'Display'. The second checkbox from the top lets you 'Show highlighter marks'. If you uncheck it, you won't be able to see the highlighter marks in your document. That also means that if you print, you won't see them. And then, when you're done, you can go back in and check it again and all of your highlighter marks will come back. Simple!
Read More

Absolute Cell References Shortcut

Ever use absolute cell references? If you're like me, you find it a pain to go in and type the little dollar signs everywhere. Next time - try this handy trick:

Click in the formula so that your cursor is in the cell reference that you'd like to make absolute. Now press F4. Excel automatically puts in the dollar signs for you. Cool, eh?
Read More

Minimize the Ribbon

Here's a neat trick - you can actually minimize the ribbon in Office 2007. Just double-click on any of the tabs, and you'll see it neatly tuck itself away into the top of your screen. Clicking once on any tab will bring it back to full size, and then it will automatically hide itself again when you click away from it. Double-click on any tab again to completely unhide the ribbon again.
Read More

E-mail Addresses from Excel Spreadsheet to New Outlook Message

Have you ever wanted to send an e-mail to all the addresses you have in an Excel spreadsheet, without importing them into your address book? It's actually pretty simple: you can highlight all the cells that contain the addresses and just copy and paste them into the 'To' field in your Outlook message.
Read More

Excel: Colour Striping Rows Using Conditional Formatting

Have you ever wanted to colour in certain rows in a worksheet to make it easier to read, but found it irritating to have to update the fill colours across the whole sheet if you ever added or deleted rows?

You can actually use conditional formatting to do it automatically for you. Here's how:

1. Click and drag to select the area you'd like striped. Go to Conditional Formatting, it's on the ribbon in the 'Home' tab, in the 'Styles' group. Choose "New Rule...".

2. Under 'Select a Rule Type:', pick 'Use a formula to determine which cells to format'.

3. Type in the following equation (substituting your own values for the variables, of course):

=MOD(ROW()-x,y*2)+1<=y

'x' is the number of the row that you want the striping to start on. 'y' is the number of rows you'd like in each stripe. For example, if you wanted the stripes to start on row 4, and each stripe should be 5 rows tall, you'll want to type in:

=MOD(ROW()-4,5*2)+1<5

4. Click 'Format', go to the 'Fill' tab, and choose how you'd like the stripes to look (colours, patterns...). Click 'OK', then 'OK' again... and tada! You'll have even sets of stripes that are based on the row numbers and the formula you entered, as opposed to manual formatting.
Read More

"Ditto" - A Shortcut to Copying the Cell Above

Here's a handy shortcut not a lot of people know about - if you want the current cell you have selected to have the same thing in it as the one directly above it, you can just press control and quotation marks:

Ctrl + "

Whatever is in the cell above it will automatically be copied to the current cell.
Read More

Insert Date in Excel Shortcut

Here's a quick way to insert the current date into whatever cell you have selected, without having it update automatically - just hold down your control button and hit a semi-colon:

Ctrl + ;

It will insert the current date into the cell (not updating automatically, just a regular old date).
Read More

Opening a Database with Visible Menus (That Were Set to Invisible)

A short while ago I set up a database and decided to make the menus all hidden to prevent users from making any undesirable changes. Unfortunately, I felt pretty silly when the time came that I myself wanted to make changes and couldn't figure out how. Luckily, I found a solution.

If you want to see the menus in an Access database that have been made unavailable, you need to close the file and then open it up again while holding down the Esc button as you open it. Keep holding that button down until it opens, and you'll (quite thankfully) see your menus once more. Phew!
Read More

Where Did My Macros and Forms Tools Go?

If you've upgraded to Word 2007, you might be frustrated when you first go through the new ribbon to try and find your macros and/or form controls. The fact is that these menu items have to be added on to the ribbon manually.

Click the Microsoft Office button, 'Word Options', and in the 'Top options for working with Word' section of the Word Options dialog box, click 'Personalize'. Select 'Show Developer tab in the Ribbon'.

Once you're done there, you'll see another tab show up on your ribbon called 'Developer'. It's there that you'll find the option to view your macros, record a new one, etc. You'll also see your form tools there - such as fill-in fields, drop-down menus, etc.
Read More

View Formulas in Excel

If you've ever wanted to check over your formuals in an Excel spreadsheet, but found it annoying to have to click on each cell to view the formula, this trick might be just the thing you're looking for!

If you press:

Ctrl + ` (that's the control button, and the apostrophe on the same key as ~)

You will be able to see all of the formulas in your sheet, making it easy to troubleshoot. When you're done, you can press Ctrl + ` again to make everything go back to normal. And don't worry, it'll probably stretch out a bunch of your columns so you can see the entire formula, but everything goes back to how you had it before when you change it back.
Read More

IF and ISBLANK: Controlling Whether a Calculation is Made or Not

There's a way to tell Excel to only perform a calculation if there are actually values for it to work with.

As an example, someone once sent me their invoice template in Excel to fix up. The total column was multiplying the number of items purchased times the price of that item. With nothing filled into the invoice yet, the totals column was just a line of zeros going down the 15 rows where you could enter items. That means that if you only entered two items, you'd have to delete all those extra zeros or just leave them there (which is sloppy). Some people work around that by using conditional formatting to turn zero value white (on a white page, the white font is invisible). I'd suggest using IF and ISBLANK together to only perform the calculation if there are actually values to work with. Otherwise, have the cell remain empty.

Using this same example, assuming your totals are in column A, the price is in column B, and your totals are in column C, enter this formula:

=IF(OR(ISBLANK(A2),ISBLANK(B2)),"",A2*B2)

It's basically saying: if A2 is blank or if B2 is blank, put nothing (""). Otherwise, multiply A2 by B2.

This ensures that the calculation only takes place once there is both a number of items and a price. Unless you really need all those zeros, this is a great way to help clean up your spreadsheet.
Read More

Change Underline Colour in Word

(Yes, I'm Canadian and I spell it colour, not color!)

Today I've got a nifty underlining trick to share - did you know you can change the colour of the underline, without changing the colour of the font? You could have black text with a purple line underneath it, for example. And it's easy!

Just highlight the text you'd like underlined, go up to your 'Home' tab on the ribbon, and in the 'Font' group you'll see the underline button (the one with an underlined U). If you click the little down-pointing arrow right next to it, you'll see at the bottom an option for 'Underline color'. You can go ahead and choose any colour you like, and you'll see the underline colour has changed but your font colour has stayed the same.

In that same menu you can also change the style of the underline... maybe you'd like it dashed, or thick? Anything you like - it can all be customized right there.
Read More

Word: Inserting Comments Shortcut

Today's question: "Is there a shortcut to insert comments into a Word document?"

There's a shortcut for just about anything imagineable - to put a comment into your Word document without using the ribbon (or menus in previous versions), just type:

Alt + Ctrl + M

It'll automatically start a new comment for you, wherever your cursor is currently positioned.
Read More

Excel: Data Validation List Source in Other Worksheet

Ever tried to limit what users can enter into a cell by making a drop-down list using Excel's Data Validation feature? You might have had a hard time selecting a range from another worksheet to use as the list source. Thankfully, there is a way to make it work. If you name the range in the other worksheet that you'd like to use as your list source, and enter that name range as the source in the Data Validation dialog box, it'll work just fine!

(Use "=TheRangeName" as opposed to something like "=Sheet2!$A$1:$B$4").
Read More

PowerPoint: Stop Text From Automatically Resizing

Want your text to stop automatically resizing itself in your PowerPoint slides? You can turn that behaviour off in your AutoCorrect options. Click the Microsoft Office button, and choose 'PowerPoint Options'. On the lefthand side of the box that comes up, click 'Proofing'. At the top, click the 'AutoCorrect Options...' button. Click the 'AutoFormat As You Type' tab, and uncheck 'AutoFit title text to placeholder' and/or 'AutoFit body text to placeholder' (choose title or body text as needed). It will now stop changing your font sizes to fit to their placeholders.
Read More

PowerPoint: Arranging Items with Gridlines and Guides

Good news! If you're trying to arrange pictures and other objects in PowerPoint, you can activate gridlines and/or guides to help you out.

Make sure you have a picture or clipart image or other object selected, then click on the 'Format' tab under 'Picture Tools' or 'Drawing Tools' on your ribbon. Next, click the 'Align' button in the 'Arrange' group. From here, you can choose 'View Gridlines' to make gridlines appear on your screen, or you can choose 'Grid Settings...'. A dialog box will pop up, allowing you to check off 'Display grid on screen' and/or 'Display drawing guides on screen'. Here, you can also change the size of the grid, by changing the number for 'Spacing' under 'Grid Settings'. Change the settings as you desire, click 'OK' when you're finished, and tada! Now you can arrange your objects easier.
Read More

Hyperlinks in Excel

There's a hyperlink function in Excel that allows you to specify the link location as well as the text that displays for you to click. Here's how to set it up:

=HYPERLINK(link_location,friendly_name)

The first section is where you put the address for your hyperlink. The second part, after the comma, is where you put in what text will display. For example:

=HYPERLINK("http://www.stacydubois.com","Stacy's Notes")
will look like this: Stacy's Notes

You can also use it for linking to files on your computer. For example:

=HYPERLINK("C:\Users\Stacy\Documents","Documents")

The "friendly_name" can also be a reference to another cell.
Read More

PowerPoint: Hiding/Showing Slides

If you have a presentation ready in PowerPoint and want to run it, but don't want one or more slides to show up - you can hide them. It's a good idea if you plan on using those hidden slides eventually, and don't want to delete them entirely - you just want them to be tucked away for a little while. Here's how to do that.

On the left-hand side of your screen, where you can see all of your slides - select the slide(s) you want hidden. To select more than one, you can click the first, hold down Ctrl, and then click each other one you'd like. You can also select slides that follow eachother by clicking the first, holding Shift, and clicking the last. Now, right-click the slide(s) and click 'Hide Slide'.

If you do those same actions again on hidden slides, you will unhide them.
Read More

Gridlines in Word

Did you know that Word has gridlines? You can turn them on by going to the 'View' tab on the ribbon, and checking off the 'Gridlines' box (it's in the 'Show/Hide' group, to the left-hand side of the ribbon).

This can be really handy if you're dealing with a lot of different objects and want to arrange them better on your page. And don't worry, even though you can see them on your screen - these gridlines won't print. And turning them off again is as easy as unchecking that same box again.
Read More

Oops!

If you've been linked to this post, it means you've clicked on a news link that is no longer posted on the Internet. Luckily, Stacy has cleverly archived all of these materials! To request a copy of any of the news items, please send an e-mail with the title and date of the news item to questions@stacydubois.com.

Cheers,

Stacy
Read More